Question 1: In what ways does your media
product use, develop or challenge forms and conventions of real media products?
For our media music video, me and
my group chose the song ‘Cut Chemist Suite’ by ‘Ozomatli’. This song falls into
the Genre of Hip Hop/Rap, therefore we tried to stick closely to the
conventions of Hip Hop and Rap music videos in order to make our music video
more realistic for the audience. To maintain this convention we did a lot of
research on other Hip Hop and Rap music videos, ranging from the early 90s to
the present time and also ranging through many different Rap artists. These
music videos mainly consisted of a lead performer and a lot of performance
shots, mixed in with a basic narrative. We followed this convention by making
Omar the lead character, with the attention based on him throughout most of the
music video. Also, we followed a basic narrative, which was Omar on his daily
commute from work to home, where in this journey, he believes that when
listening to this song that the world comes alive and joins in with him.
However, we split up the narrative with performance shots of him in various
locations.
However, we tried to challenge
and subvert the convention. This was achieved by making the music video quite
light hearted and not to be taken seriously, as we aimed for it to be a fun,
humorous and entertaining video, which we believe fitted with the song, in the
way in which we interpreted it. However, this challenges the convention of most
Hip Hop/ Rap music videos, as they are quite serious and used to create a star
gaze for the rapper and to most often make them look powerful or intimidating.
Another way we tried to challenge
the convention but also somehow conformed to it by the choice of clothes worn
by Omar in the music video. In a Hip hop/Rap music video you would usually
expect to see the main person wearing clothes of a stereotypical Hip hop artist
such as baggy jeans, baggy t-shirt, baseball cap and jewellery. However, Omar wears a purple pimp costume.
This challenges the stereotypical convention of rap artists, however, it also
makes fun of the stereotype of young African-American males in the US at the
time period that this song was made, so therefore it also develops the
convention of stereotypes in a humorous, exaggerated way.
The mis en scene played a large
part in creating a star gaze for the main character Omar because his bright
purple pimp suit and his exaggerated dance moves and characteristics,
contrasted highly with what was going on around him. Grey weather, grey
buildings, traffic, dull dressed people commuting to work, all brought out the
personality of Omar’s character and made his star gaze increase dramatically.
Also, Omar’s character’s gestures
followed the main convention of rappers and their music videos by being quite
aggressive and confident as you would see in most Hip Hop rap music videos. You
can see this in the music video as he shouts parts of the lyrics “F*cking
actors!” while pulling an aggressive expression on his face and also an
aggressive stance as he abruptly moves his arms.
Another way we developed and
challenged the conventions of Hip hop and Rap music videos was the location in
which we filmed our music video. We decided to have Omar rapping through
Welling High street. We chose this location because it is an urban location and
is quite busy and bustling as you would expect from a stereotypical rap video’s
location. However this location also makes fun of the convention as Welling
High street is not the most glamorous of locations and also isn't the most
Americanised or ‘street’, so it very much contradicts the Hip hop vibe from the
song. This gives the song some humour and entertainment value.
We used a lot of handheld shots
as we found that this added to the humour and entertainment of our music video
as we felt that it made the video look a bit less scripted and professional,
and made it look more natural and realistic, as if you were following Omar down
Welling High Street as he raps.
In the video below we discuss
some of the ways in which we used, developed or challenged forms and conventions
of real media products, in our own media product.
Also, here is the music video ‘Who
Dat’ by ‘J-Cole’. This music video was a strong influence and created the idea
of the continuous walking of Omar as the camera followed him.
_________________________________________________________________________________
Question 2 : How effective is the combination
of your main product and ancillary texts?
I feel that my main product and
ancillary task made a good combination. When asked to make a digipak for my
ancillary task, I started to plan out how I was going to create a direct
correlation and link between my music video and digipak. I achieved my planning
by writing notes onto a notepad of what I wanted to incorporate into my digipak
that is new and fresh but also what I want to bring from my music video to
carry on the ethos and house-style of the song.
To make this link between the music
video and digipak I felt that they must have the same ethos and look, while
also keeping their own fresh separate characteristics so that they do not look
the exact same which would be boring as a task to complete but also boring for
the end users to view. To incorporate what I have already used in my music
video, to put on my digipak, I decided that there must be direct images taken
from our music video put onto the digipak. This creates a direct link between
my main product and ancillary task.
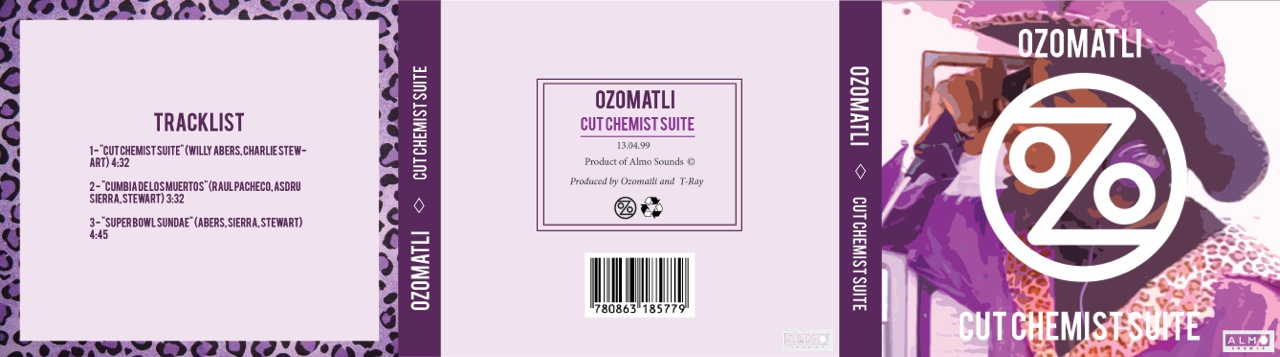
The images I decided to use were
Omar in his purple pimp suit in a telephone box rapping into the phone. I used
this image for the front cover of my digipak. I used this image because I think
that its sums up Omar’s character in a ‘nutshell’. This is because it shows him
being confident as he doesn’t mind rapping into a phone in a telephone box and
it also shows him in his crazy attire which was the main theme and attention of
our music video. I also used an image of him looking straight into the camera
lens. I placed this photo where the CD is placed in the digipak. I used this
location because it is going to be one of the main places the user is going to
look at, as they are going to remove and replace the CD from the digipak.
I also wanted to make a link with
the music video and digipak by the use of colours. In my music video, you can
clearly see that the main colour theme of the music video is purple. This is
clear to see as Omar, the main character, is wearing a very bright purple pimp
suit and the entire music video is filtered with a bright shade of pink.
Therefore I wanted to incorporate this simple colour scheme to my digipak so
that the user could make a clear correlation between the two and recognise what
song the digipak represented if seen on a shelf of a music store or seeing the
album art on an online music download website. Therefore I used a lot of purple
on my digipak, using a dark purple on the spines of the digipak, and using a
very light shade of purple for most of the sides of the digipak. Also, as a
boarder, I used a purple leopard print. This related to Omar’s costume in the
music video as he was wearing a purple pimp suit lined with leopard print.
Carrying on the theme of
incorporating the ethos and house-style of the music video, I found the
original logo of the band ‘Ozomatli’ which appears to be a big ‘O’ with a ‘Z’
in the centre of it. This clearly represents the Oz part of their name. I
therefore photoshopped this logo onto the front cover of my digipak so that
fans of Ozomatli could clearly recognise the logo and therefore be interested
in the digipak. Logos are used by many big companies and businesses to
distinguish themselves from other companies and businesses so that customers
and clients remember them. Logos are proved to be extremely successful at this
as anyone can recognise a Mcdonalds or CocoCola sign from a quick glance.
However the digipak is not just
about visuals and presentation. It is also very informative as it has a
Tracklisting, which states which songs are on the CD and there is also a page
of writing about the history of Ozomatli and information about the song. This
would be a good read for fans of the band and also gives them background
information about the band and the music video.
For the writing parts of my
digipak I decided to keep a consistent font throughout the entire digipak. I
chose to do this because I didn't want a mismatch of all different fonts making
the digipak look a mess and ruining the consistency of the ethos and house-style
of the digipak. I also done the headers and titles of each page in a consistent
bold font.
Overall I feel the look of my
digipak is very minimalistic but also modern in design, fun and funky but also
sticks to the colour scheme and general look of the music video.


______________________________________________________
Question 3 : What have you learned from your audience feedback?
Question 3 : What have you learned from your audience feedback?
Before making the final music
video we decided to show our ideas of our music video to the year below us
media class. We then handed out questionnaires to the class and asked them to
fill them in. We done this so we could get audience feedback on our ideas and
know what they like and done like so we could change or improve upon it before
it was too late.
When presenting our presentation
to the Year 12 Media class we gave an A4 hand-out sheet. This sheet included a
basic explanation of our concept of our music video. It also included a mind
map of our main ideas. This mind map included various ideas we thought of
including into our music video. These include; Roles, Props, Location,
Inspiration, Mis en Scene. Then finally, at the bottom of the hand-out sheet is
4 questions. These questions were for the Year 12 media class to answer after
they watched our presentation.
The first question is: Do you see
any problems in the way we are planning to make our music video?
The feedback we received from
this question was all quite unanimous. The basic feedback from this question
was that they could see problems with getting permission with filming in the
train station. Some of the feedback also thought there could be problems with
having multiple people following Omar and make them shout "party
people". However the majority of the feedback from this question was very positive
with everyone thinking it was a really good idea and that we won’t encounter
many problems with the making of the music video.
The second question is: Do you
have any suggestions in order to make it better?
The feedback we received for this
question had 3 different answers. The most common feedback for this question
was that there should be more locations. This is encouraging as we were
planning to add more locations anyway. The second most common answer to this
question was that there should be more varied shot types. This was
understandable as we did not show off many different shot types in the test
shots that we presented to the Year 12 media class. The third thing people were
saying was that the people dancing in the background should really be animated
and enthusiastic to not make it look half hearted.
The third question is: Did you
find the concept easy to understand?
The feedback to this question was
completely unanimous that yes, the concept is very easy to understand and clear
to follow.
The fourth question is: Do you have
any additional ideas to help us?
One of the answers to this
question forwarded our project a lot. 'At the beginning when he's at the train
station coming from work, he should appear a completely different person to him
with his headphones on'. This made us think of dressing Omar up in a pimp suit
when he puts the headphones on, in contrast to wearing his normal clothes
before he puts his headphones on.
Here are a few examples of the questionnaires that we received back from the pupils.


Here are a few examples of the questionnaires that we received back from the pupils.


After we gathered all this
information together, we took it all into consideration and applied the ideas
and feedback to our final music video. I feel that our music video was helped
greatly by these ideas and feedback.
Finally, as our music video was
finished, we then created a new questionnaire consisting of 8 new questions to
ask our fellow pupils in our media class and also other people. This resulted
in 30 people. These are the questions that the questionnaire consisted of:
Question 1: Do you think our
video suits our song?
We asked this question because it
was fundamental to use that our music video represented the song well. If the
music video and song didn't suit then our video wouldn't be very successful and wouldn't represent the song well at all.
Question 2: Which emotion did you
feel the most when watching our music video?
We asked this question because we
set out to create an entertaining and funny music video while also inspiring
the audience by the main characters star gaze and sense of confidence and
strong message that he is putting forward through his lyrics. From the answers
we would see which of the emotions would be felt most predominantly when viewed
by the audience so we can see which emotion was most strongly represented and
evoked.
Question 3: Which age group do
you think best suits our music video?
We wanted to know the answer to
this question because we wanted to know if our aim to make our music video appealing
to a wide range of ages, was successful.
Question 4: What was your
favourable/ most memorable part?
We asked this question because we
wanted to know out of curiosity, which part of our music video was the best and
most memorable for the audience so that we could know what techniques we used
in that part of the video which made it so successful.
Question 5: Would there be
anything you would change/improve?
We asked this question because we
wanted to know out of curiosity, what the audience didn’t like about our video
or what they thought could have been changed or improved. This would give us a
clear understanding of things that worked and didn't work in our music.
Question 6: What would you rate
our video out of 7?
This question is quite obvious
and simple why we asked it. Simply to see how our class rated our music video.
Question 7: Would you recommend
our video to anyone?
This was also a simple question
to see if our audience would recommend our video to anyone, which is a great
way to get a more widespread acknowledgement for our music video and boost its popularity.
Question 8: Is there any
additional comments you would like to add?
This question is just for extra
feedback so they are not limited to multiple choice.
Here are the results from our
questions put into graph form for easier understanding:


How did you use media
technologies in the construction and research, planning and evaluation stages?
While constructing our media
product we have used many different forms of technologies. Through this process
i have learnt alot about these technologies, from how to use them to how they
work. These technologies were essential for us to progress and create our media
product to the standards that they are at.
Here are some of the different
technologies that we used to create our media product:
www.wix.com


This website wix.com was one of
the most used softwares we used for our project. This is because we used it to
create our website in which we would showcase different information about our
project such as research and other vital information. This website also was
used as a link to our media group blog where, as a group, we updated the blog
daily with new information about the goings on of our project such as filming
schedules and location scouting. On wix.com i have learnt how to create a
website and customise templates to fit my preference. From this website i have
also learnt how use a blog and how to update it with information and up to date
data. I found this software to be a great asset to creating my media product
because from this website we could advertise our media product and group to
anyone who is interested on the internet. I also found it helpful because from
noting down things like filming schedules and location scouting i could refer
back to the website to remember this information and monitor our progress as a
group. Before starting this project i was clueless to how to create a website
or blog but with the help of teachers, fellow peers and online tutorials i
quickly became accustom to using this tool and started to progress swiftly with
it.
Camcorder


For our media project the school
equipped us with a JVC Everio camcorder to film with. This is a small, compact
and light camcorder with great picture quality, a good choice for an amateur
filming group such as ourselves. The camcorder has a built in hard drive disk
(HDD) which can store hours upon hours of filming. This was useful because it
meant we didn't need to fiddle around with memory cards and have the risk of losing
them and it also meant that we could film for hours on the camcorder without
running out of room, making it more convenient then keep exporting the video
files to the iMacs. The picture quality on these camcorders is good, but not
exceptional. They are good enough to make a film out of but in my opinion they
lacked detail and depth to create a professional looking music video. But
keeping in mind that they are very cheap compared to a professional camera i
think that they were the best choice for our group. The lightness and
compactability of the camcorders meant they were easy to take to location as
they fit in any conventional bag or the carry case provided. This also meant
that they were easy to hold, convenient for me as i was the camera man.
Being the camera man meant that
i, out of anyone in the group, would have to get most familiar with this
technology. Having already used a camcorder before this project many times
meant that i was already very familiar with using this technology and had no
problems with using it whatsoever. However i learnt that i could take still
images using the camcorder, this is something i never knew before. I also
learnt how to use the interface of the camcorder as it is partly touchscreen,
this is something i haven’t come across before and was excited to learn how to
use, which took no longer than a day. The camcorder was a very vital part of
our project because without it we wouldn't have been able to film our project.
I did not particularly understand
fully the difference between HD cameras and normal cameras before, not knowing
how much the quality of the two differed, our group firstly used a non-HD
camera for our first filming session because a HD camera had not been available
and we were eager to begin the filming process; however when we uploaded our
footage onto the IMac we discovered that it was of very poor quality. We had dimmed our shots to add to the gritty
and look of the opening however we found that this made the quality even worse
and the image became very grainy. It
then became apparent that we would have to use a HD camera to re-film the
footage. This had a great impact on our filming because it meant that we had
lost a weeks’ worth of filming, it set us back greatly. Once we had a HD camera
we re-filmed the scenes, and the original footage we had filmed worked as a
test shot source and we were able to film the scene much more effectively
adding in shots that differed from ones we had originally filmed to make it look
more effective. We successfully re-filmed the footage, improving it with new
shot angles and better picture quality.
Tripod
 Along with the camcorder, our school equipped us with a Tripod. The tripod is used to attach the camcorder to and capture steady shots as the tripod would hold the camcorder for you. As the cameraman, i found this tool extremely useful in the making of our music video. This is because when the camcorder is attached to the tripod it is extremely steady and much steadier than i could ever hold it in my hand. This, therefore was useful for steady shots in our music videos. Also, the tripod's legs are adjustable so that i could adjust the lengths of them to make them longer or shorter depending on the angle of the shot i wanted to achieve. Another useful thing about the tripod is that the stand pivots and twists so that o could move the camcorder whilst it was still attached to the tripod. This gave me a great way of panning, just by swiveling the stand and it also gave me a great pivot point so that i could change from a low angle shot to a high angle shot very quickly and smoothly. The tripod is very easy to store as well as it folds away into a very neat package meaning that we could take the tripod easily to whatever location we were filming our music video whether it was on Welling High street or Danson Park.

www.youtube.com

We also used Youtube to look at
music videos that might inspire us. We also used Youtube to find certain sounds
that we would later add into our music video such as a ‘ding’ from a bell.
iMovie

iMovie was one of the most important parts of our project. This is because, this is the software that we used to edit our music video. iMovie is a software exclusively available to Apple products, so as i don't own one i could only do editing when in my media class. iMovie is a great software as it is easy to use and can achieve many different tasks to make our music video look professional However it had its faults as some of the controls were difficult to fathom and it could sometimes take a very long time to edit a short clip.
We used this software to cut, edit, add effects, overlay the song, and many other things. Therefore without this software our music video wouldn't have been very successful.

I used Photoshop and inDesign extensively to create my digipak and poster. Both software's offer differ features and both were very useful at creating my digipak and poster. I used inDesign to create the layout and designs of both my digipak and poster. I also used it to overlay text and headers and create the general template of both my digipak and poster. After i was finished with all that i then used Photoshop to edit and superimpose the pictures of Omar onto my digipak and poster to create the final look.
Blogger

Blogger is what i am using now to upload this evaluation. It is an easy website to use and is very useful at writing long blogs that involve pictures and videos.
iMac

All of my music video was achieved on an iMac which is pictured above. They are the choice for created projects such as ours because they are what our Media teachers provided us with and are predominantly known for creative software's and general design.
No comments:
Post a Comment